Rancher DesktopはKubernetes(以降K8s)とコンテナイメージの作成やコンテナでのアプリケーションのテストをできるツールです。この記事を書いている現在はBetaリリースレベルではありますが、Linux、macOS、Windows向けのRancher Desktopが提供されています(Docker Desktopと異なり、Rancher Desktopもオープンソースで開発されています)。
類似するツールとしてDocker Desktopがありますが、大きな違いとしては次の特徴があります。
- デプロイできるK8sのバージョンを選べる(変更も容易)
- コンテナランタイムとして、containerdとDockerを選択できる
スクリーンショットツアー
初回インストール後の起動で、K8sのバージョンとランタイムの選択ができます。

そしてこれがRancher Desktopアプリの管理画面です(Rancher Serverが動くわけではありません)。

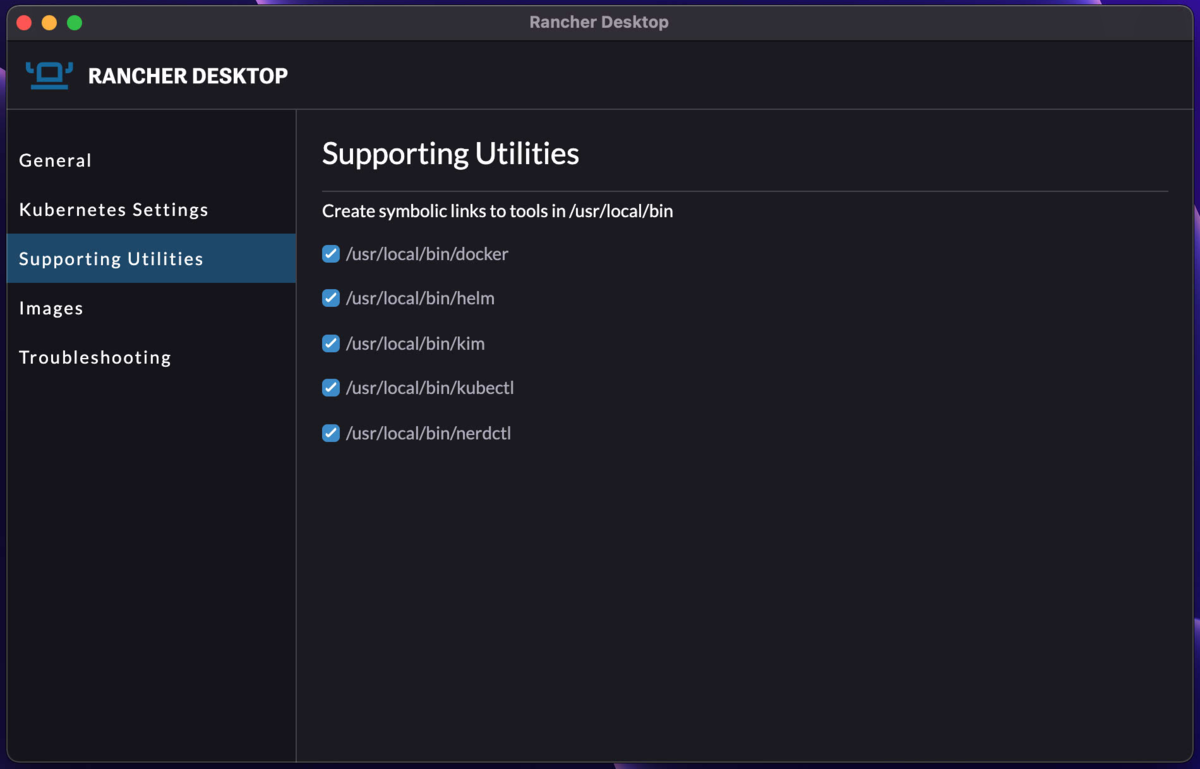
CLIたちは管理画面のチェックボックスを有効化するだけでクライアントで実行可能になります。万が一他の方法でインストールされたCLIツールがクライアントに存在する場合は、そちらを使うこともできます。コンテキストを切り替えてから利用する形になると思います。

利用中のイメージの一覧は管理画面から確認できます。

そして実はこの画面からコンテナイメージのスキャンが可能になっています(他の環境でスクリーンショットを撮ったので、急に画面が白くなってすみません。目、目がー)。

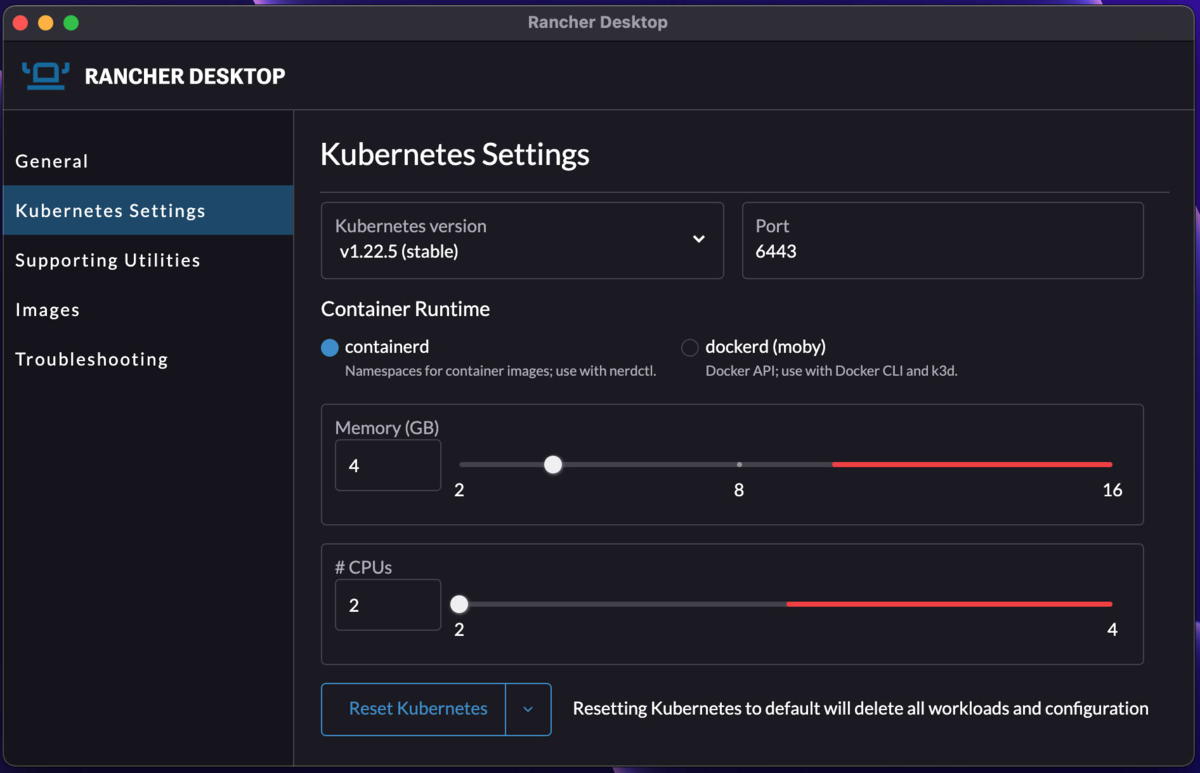
導入後のランタイムやK8sのバージョンの切り替え、リソース制御も可能です(古いMacでスクリーンショットを撮ったので、メモリとCPUの限界がしょぼい感じになっています)。

以上の利点から、本番のK8sクラスターにアプリケーションを展開する前に、 手元の環境でアプリケーションのテストが可能になります(K8sのバージョンが選べるところが最大のポイント)。
containerdをCLIで使ってみる
containerdはK8sで使えるランタイムの一つです。実はDockerでもコンテナ周りはcontainerdが使われています。そのため、K8s 1.24でDockerのランタイムを利用する場合に使われる「Dockershim」が取り除かれるのに伴ってランタイムの切り替えがそろそろ必要になりますが、ほぼ影響はないであろうcontainerdは切替の候補として有力な一つです。
containerdでCLIを使う方法は初期からあったものの、一般的に使うための用途では利用されていませんでした。そこで、DockerのようにCLIでコンテナーイメージを作ったりコンテナを動かしたりしたいということで開発されたのがnerdctlです。nerdctlはDocker CLIと全く一緒というわけではありませんが、DockerのCLIとほぼ同じ使い勝手になっています。Rancher Desktopをインストールすると、設定変更だけでnerdctlコマンドをクライアントで利用可能になります。
% nerdctl --help
nerdctl is a command line interface for containerd

Usage:
  nerdctl [flags]
  nerdctl [command]
Management commands:
  apparmor    Manage AppArmor profiles
  container   Manage containers
  image       Manage images
  ipfs        Distributing images on IPFS
  namespace   Manage containerd namespaces
  network     Manage networks
  system      Manage containerd
  volume      Manage volumes
Commands:
  build       Build an image from a Dockerfile. Needs buildkitd to be running.
  commit      Create a new image from a container's changes
  completion  generate the autocompletion script for the specified shell
  compose     Compose
  events      Get real time events from the server
  exec        Run a command in a running container
  help        Help about any command
  images      List images
  info        Display system-wide information
  inspect     Return low-level information on objects.
  kill        Kill one or more running containers
  load        Load an image from a tar archive or STDIN
  login       Log in to a Docker registry
  logout      Log out from a Docker registry
  logs        Fetch the logs of a container. Currently, only containers created with `nerdctl run -d` are supported.
  pause       Pause all processes within one or more containers
  port        List port mappings or a specific mapping for the container
  ps          List containers
  pull        Pull an image from a registry. Optionally specify "ipfs://" or "ipns://" scheme to pull image from IPFS.
  push        Push an image or a repository to a registry. Optionally specify "ipfs://" or "ipns://" scheme to push image to IPFS.
  restart     Restart one or more running containers
  rm          Remove one or more containers
  rmi         Remove one or more images
  run         Run a command in a new container. Optionally specify "ipfs://" or "ipns://" scheme to pull image from IPFS.
  save        Save one or more images to a tar archive (streamed to STDOUT by default)
  start       Start one or more running containers
  stats       Display a live stream of container(s) resource usage statistics.
  stop        Stop one or more running containers
  tag         Create a tag TARGET_IMAGE that refers to SOURCE_IMAGE
  top         Display the running processes of a container
  unpause     Unpause all processes within one or more containers
  version     Show the nerdctl version information
  wait        Block until one or more containers stop, then print their exit codes.
(以下略)
早速nerdctlでコンテナを動かしてみましょう。
% nerdctl container run --rm hello-world
WARN[0000] kernel support for cgroup blkio weight missing, weight discarded
docker.io/library/hello-world:latest:                                             resolved       |++++++++++++++++++++++++++++++++++++++|
index-sha256:975f4b14f326b05db86e16de00144f9c12257553bba9484fed41f9b6f2257800:    done           |++++++++++++++++++++++++++++++++++++++|
manifest-sha256:f54a58bc1aac5ea1a25d796ae155dc228b3f0e11d046ae276b39c4bf2f13d8c4: done           |++++++++++++++++++++++++++++++++++++++|
config-sha256:feb5d9fea6a5e9606aa995e879d862b825965ba48de054caab5ef356dc6b3412:   done           |++++++++++++++++++++++++++++++++++++++|
layer-sha256:2db29710123e3e53a794f2694094b9b4338aa9ee5c40b930cb8063a1be392c54:    done           |++++++++++++++++++++++++++++++++++++++|
elapsed: 3.4 s                                                                    total:  4.4 Ki (1.3 KiB/s)

Hello from Docker!
This message shows that your installation appears to be working correctly.

To generate this message, Docker took the following steps:
 1. The Docker client contacted the Docker daemon.
 2. The Docker daemon pulled the "hello-world" image from the Docker Hub.
    (amd64)
 3. The Docker daemon created a new container from that image which runs the
    executable that produces the output you are currently reading.
 4. The Docker daemon streamed that output to the Docker client, which sent it
    to your terminal.

To try something more ambitious, you can run an Ubuntu container with:
 $ docker run -it ubuntu bash

Share images, automate workflows, and more with a free Docker ID:
 https://hub.docker.com/

For more examples and ideas, visit:
 https://docs.docker.com/get-started/
Dockerを前提としたコンテナイメージで、コンテナーを動かすことができました。 今度はNGINXを動かしてみましょう。
% nerdctl container run --name=cont1 -d -p 8080:80 nginx:alpine
WARN[0000] kernel support for cgroup blkio weight missing, weight discarded
3236506a0d6035896fd16bf4c9a099cb0a45a78cc620700ee3b0a265ca4019e0
ちょっと警告は出ましたが、コンテナを動かすことができたようです。
% nerdctl container ls
CONTAINER ID    IMAGE                             COMMAND                   CREATED               STATUS    PORTS                   NAMES
3236506a0d60    docker.io/library/nginx:alpine    "/docker-entrypoint.…"    About a minute ago    Up        0.0.0.0:8080->80/tcp    cont1
実行したコンテナアプリケーションにアクセスしてみます。
% curl http://localhost:8080
<!DOCTYPE html>
<html>
<head>
<title>Welcome to nginx!</title>
<style>
html { color-scheme: light dark; }
body { width: 35em; margin: 0 auto;
font-family: Tahoma, Verdana, Arial, sans-serif; }
</style>
</head>
<body>
<h1>Welcome to nginx!</h1>
<p>If you see this page, the nginx web server is successfully installed and
working. Further configuration is required.</p>

<p>For online documentation and support please refer to
<a href="http://nginx.org/">nginx.org</a>.<br/>
Commercial support is available at
<a href="http://nginx.com/">nginx.com</a>.</p>

<p><em>Thank you for using nginx.</em></p>
</body>
</html>
ちなみにnerdctlでコンテナを動かしても、Kubernetes(k3s)側にそのコンテナが現れることはありません。イメージを作成するための環境、K8s上でアプリケーションの実行をテストするための環境を別々にすることなく、Rancher Desktop一個のインストールで済むので非常にありがたいです(もちろん本当のKubernetesとK3sには設計・実装上の違いはあるので、そちらでのテストも必要ではありますが)。
% kubectl get po -A
NAMESPACE     NAME                                     READY   STATUS      RESTARTS   AGE
kube-system   local-path-provisioner-64ffb68fd-shc85   1/1     Running     0          73m
kube-system   metrics-server-9cf544f65-c4t6m           1/1     Running     0          73m
kube-system   coredns-85cb69466-8nxmb                  1/1     Running     0          73m
kube-system   helm-install-traefik-crd--1-57nkr        0/1     Completed   0          73m
kube-system   svclb-traefik-j49n8                      2/2     Running     0          72m
kube-system   helm-install-traefik--1-cljj5            0/1     Completed   1          73m
kube-system   traefik-786ff64748-rw5xd                 1/1     Running     0          72m
kube-image    builder-9gjdv                            2/2     Running     0          72m
次にコンテナーイメージのビルドを試してみましょう。 まずは次のようなDockerfileとHTMLファイルを作っておいてください。
% cat Dockerfile
FROM docker.io/nginx:alpine
ADD index.html /usr/share/nginx/html/

% cat index.html
<html>
<body>
Welcome to My site!
</body>
</html>
ビルドを実行します。DockerやPodmanなどとコマンドやオプション体系は同一です。
% nerdctl build -t custom-nginx:latest -f Dockerfile .
[+] Building 2.2s (7/7) FINISHED
 => [internal] load build definition from Dockerfile                                                            0.0s
 => => transferring dockerfile: 31B                                                                             0.0s
 => [internal] load .dockerignore                                                                               0.0s
 => => transferring context: 2B                                                                                 0.0s
 => [internal] load metadata for docker.io/library/nginx:alpine                                                 1.0s
 => [internal] load build context                                                                               0.0s
 => => transferring context: 31B                                                                                0.0s
 => [1/2] FROM docker.io/library/nginx:alpine@sha256:eb05700fe7baa6890b74278e39b66b2ed1326831f9ec3ed4bdc6361a4  0.0s
 => => resolve docker.io/library/nginx:alpine@sha256:eb05700fe7baa6890b74278e39b66b2ed1326831f9ec3ed4bdc6361a4  0.0s
 => CACHED [2/2] ADD index.html /usr/share/nginx/html/                                                          0.0s
 => exporting to oci image format                                                                               1.0s
 => => exporting layers                                                                                         0.0s
 => => exporting manifest sha256:1594cfc3752a1233d730991c08e94557701e5a9de2016bc5f13dbfdda0328044               0.0s
 => => exporting config sha256:9476dd5deba2d65b281d5d61fa521e1c73155b13e07102476786f734ad7e8dc5                 0.0s
 => => sending tarball                                                                                          1.0s
unpacking docker.io/library/custom-nginx:latest (sha256:1594cfc3752a1233d730991c08e94557701e5a9de2016bc5f13dbfdda0328044)...done

% nerdctl image ls
REPOSITORY      TAG       IMAGE ID        CREATED           PLATFORM       SIZE
custom-nginx    latest    1594cfc3752a    3 seconds ago     linux/amd64    26.4 MiB
hello-world     latest    975f4b14f326    56 minutes ago    linux/amd64    20.0 KiB
nginx           alpine    eb05700fe7ba    52 minutes ago    linux/amd64    26.4 MiB
作成したイメージは他のランタイムと共通した方法でレジストリーに登録してシェアできます。
kimとは
一方kimはKubernetes Image Manager、コンテナイメージの作成やレジストリーへの登録に特化したツールです。 イメージビルドはnerdctlでも可能ですが、kimとnerdctlはちょうど、buildahとPodmanやDockerと同じような分類のツールに当たります。前者はイメージに特化したもの、後者はなんでもできる万能なツールです。
kimはGitHubで開発されていますが、こちらをみていただければ分かるように、kimはシングルバイナリで動作するツールです。なので圧倒的に「軽い」ソフトウェアです。
検索していたらkimについて説明している動画を見つけたので、参考までに貼り付けます。
早速動画を参考に試してみたのですが、手元のバージョンと環境では次の様なエラーが発生して、イメージの作成までには至りませんでした。
% kim build -f Dockerfile .
FATA[0001] failed to solve: rpc error: code = Unknown desc = error getting credentials - err: exec: "docker-credential-desktop": executable file not found in $PATH, out: ``
ランタイムをDockerに切り替えてみる
ランタイムをDockerに変更した場合はDocker Desktopと同様に、docker CLIで操作できます。
% docker container run --name=cont1 -d -p 8080:80 nginx:alpine
Unable to find image 'nginx:alpine' locally
alpine: Pulling from library/nginx
59bf1c3509f3: Pull complete
f3322597df46: Pull complete
d09cf91cabdc: Pull complete
3a97535ac2ef: Pull complete
919ade35f869: Pull complete
40e5d2fe5bcd: Pull complete
Digest: sha256:eb05700fe7baa6890b74278e39b66b2ed1326831f9ec3ed4bdc6361a4ac2f333
Status: Downloaded newer image for nginx:alpine
c47fbb5690f4aeeae8543e078d3f06e7b9205f25b28ab75c699f3bec35c6fa74
KubernetesもランタイムとしてDockerが使われるようです。こちらはdockershimのサポートの件で いずれ使えなくなるのではと思っています(k3sの動向は様子見中)。
% kubectl get no -o wide
NAME                   STATUS   ROLES                          AGE    VERSION        INTERNAL-IP     EXTERNAL-IP   OS-IMAGE             KERNEL-VERSION   CONTAINER-RUNTIME
lima-rancher-desktop   Ready    builder,control-plane,master   131m   v1.22.5+k3s1   192.168.0.138   <none>        Alpine Linux v3.14   5.10.82-0-virt   docker://20.10.11
なお、Dockerランタイムに切り替えると、デフォルト設定ではcontainerdよりもメモリを2GB多く要求されます。 ただ、Docker Desktopを動かしているよりは、バックで動いているVMが消費するメモリーは少ないように見えました。
メインの作業端末もDocker DesktopからRancher Desktopに変えようか、現在検討中です。今はローカルでKubernetesクラスターが必要になったらKindを使っていますが、切り替えればRancher Desktopを起動するだけでクラスターが元通りになります。
さらにDockerランタイムに切り替えれば、今のDocker Desktopとおおよそ変わらない使い勝手をクライアント上で実現できる点もいい感じでした。
実は最近、筆者はDocker Proライセンスに切り替えたばかりなのですが、Docker HubのPull制限緩和と独自イメージ管理の優遇措置があったりするので、多分来年以降も継続すると思います(Docker Pro云々の話はいずれまた)。
Betaグレードとはいえ、すでに完成度が高い仕上がりになっていると私は感じました。もし気になったら使ってみてください。